Organization
Bins for Storage
Supplies
Routine
Chores
Printing, Laminating, & Binding
Organizing Your Coils
I'm going to share some things that have worked well for organization in our homeschool.
Bins for Storage
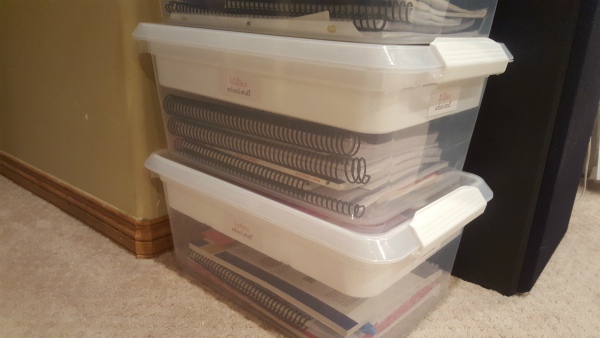
All of our school workbooks and supplies go in these Latchmate Storage bins. I got mine at Michael's, but I've seen similar items at Superstore, Staples, and Home Depot. These are great because you can keep curriculum and supplies all in one place, and go wherever you need to go. Whether that is just to another room, or to another location entirely. We bring ours to homeschool band every week.
Supplies
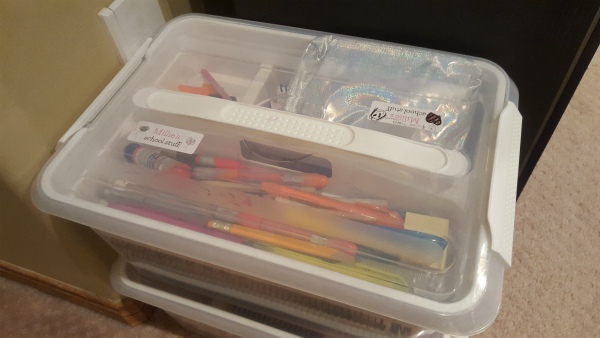
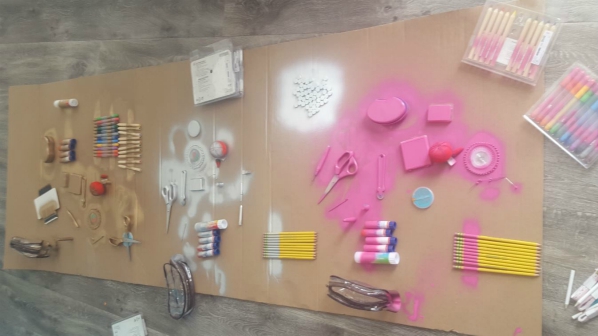
Something else I've learned is that my kids are WAY more responsible with school supplies when they feel a sense of ownership over them. So a few years ago, I let each girl pick a color, and I bought a can of spray paint in that color. Whenever we get new supplies (or sewing notions, which are also in my picture below), then I spray them in the color. Being careful to not spray the whole thing - you need to still be able to tell what colors the markers actually are. When I printed labels for the bins, I used those same colors for the names. And I labelled each piece - bin, tray, and lid. Bins are going strong a few years later. We still have most of our supplies from last year.
Routine
And as far as our schedule goes, I used to make extremely elaborate spreadsheets detailing every page that we were going to accomplish throughout the year.
And then I actually homeschooled my kids :D And realized, those spreadsheets had set us up for failure, because they were so incredibly demanding and also so incredibly impossible to keep up with... so I don't do those anymore.
Instead, we just Do What's Next. We have a plan. I do usually count lessons at the beginning of the year to get a general idea of how much per day we should aim for to try and finish by April or May. Because let's be honest: Once the sun comes out after winter, we don't want to be stuck inside doing schoolwork anymore. But we are not beholden to any certain page or lesson count.
You'll notice that we have a four-day school week. When we first began homeschooling, I was determined to make use of every minute of every day. My facilitator gently told me that a lot of homeschool families keep four-day school weeks and then travel for every long weekend.
We don't travel a lot ;) So I brushed his suggestion aside and ignored it, until I burned out. And I realized the wisdom in that council. And I realized, my husband's work week is not such that we are going to take long weekends often. BUT, having a break in the middle of the week for errands, music lessons, and general catching up is a great idea. So that is what we have been doing now for four years.
Now, this is what we do: I have a list of tasks that we need to get done each day before we're "free". I print off my lists, stick them in plastic sleeves, and put them up on the wall for all to see, somewhere that we will pass by frequently. As we get things done, we cross off each item with a dry erase marker.
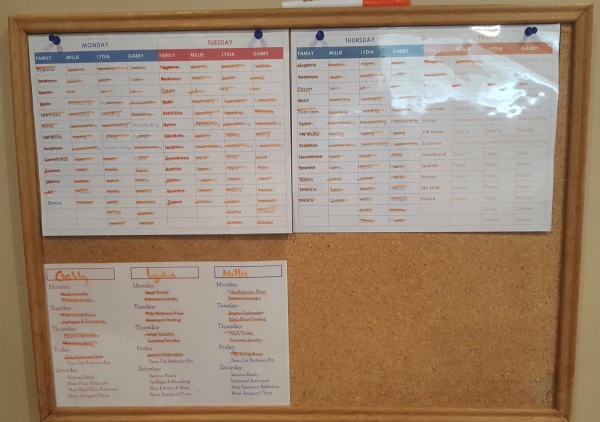
This layout has been 4 years in the making, but it has been our most successful ever. We have a list of "family activities" that we get done first after our morning routines (breakfast, dressed, hygiene, beds). It is almost pointless to try to get everyone together again after we've dispersed, so family stuff happens first.
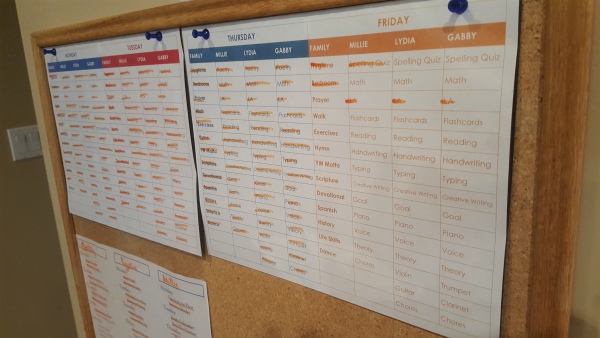
Then, we break apart and do individual activities. My girls take turns doing math and English individually with me, and they take turns making noise practicing their various instruments. They also have individual quiet things to get done.
Chores
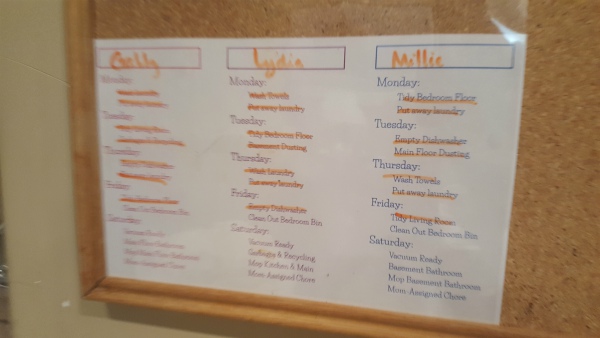
Last on their lists are "Chores". And we have a separate chores list that rotates names each week. I'm pretty big on knowing how to do chores. I grew up as an only child whose mother loved me so much, that she did all of the housework for me. When I was 12, I was at my friend's house, who was the oldest of 6. Her mother put us in charge of making lunch for all of the little kids. And I didn't know how to make a PB&J sandwich. I was mortified. I also didn't know how to wash dishes or clean bathrooms. So, to spare my children any future embarrassment, I am determined that they will be proficient in these basic tasks. ;)
Printing, Laminating, and Binding
If you see yourself homeschooling for the long haul, I totally recommend investing in a good printer, possibly a laminator, and maybe even a binding machine.
I have a Brother MFC-9130CW, which prints beautifully with these Amazon knockoff toner cartridges.
I supplement my toner and paper allowance by using the free printing available at the Calgary Public Library.
I also have a TruBind machine, and it is just the best thing ever. Ever. I raved about it so much, my friend Christina got one too and made a video about it for her blog. See below ;) I order my coils from Cortech (now Skandacor) because they are in Canada and shipping is better.
One of the coolest things about doing the binding myself is that I can organize our curriculum exactly the way that works best for our family. An example is our science units. The Good and The Beautiful Science is awesome and open-and-go, but I've found it goes smoothest if I've prepped the units before we go, cutting apart and laminating things like vocabulary words and game pieces beforehand. And it's easiest for me if those extra pieces are just in the textbook when I need them. So I bind envelopes to hold those things right into the books.
.jpg)
I write on the envelopes what should go in them. And before I laminate pieces, I write on the backs of each piece 1) Which curriculum that piece belongs to, and 2) Which chapter. So that if pieces ever get misplaced, it'll be easy to put them away. And so that at the end of the unit, it's easy to put things away.
.jpg)
And of course, the pieces are never the same sizes. So I use legal, 5x7 and full sized manila envelopes to accommodate differently sized pieces.
.jpg)
The biggest manila envelopes (that I get from the dollar store) are bigger than 8.5x11, so I trim the side that's going to be bound, and I trim the opening and recreate the flap to fit. That leaves the outer edge and bottom untouched.
.jpg)
Now, admittedly, once you start adding in things that aren't all the same size to your binding, it can get a little hairier. Straightening your stack isn't going to align everything. So when I'm adding envelopes or anything smaller than the rest of the stack, I use paperclips to keep my holes aligned as I punch them. Stack of paper, punch. Single envelope, punch. Repeat until your book is done. This picture just has paperclips on the ends - but I've since found that using 3-4 is actually better if your edges aren't all 11". I'll try to come back and update this spot next time I bind something!
.jpg)
Another awesome thing with binding is all of the fun things you'll come up with. I make little flip books for poetry memorization. They fit perfectly in our bin trays, and the small size forced me to break poems into more manageable pieces. When they finish memorizing a section, they get to color the correlated picture. When they're working on a poem with multiple pieces, I make them review the previous sections and be able to recite the poem from the beginning in order to pass off the next section.
.jpg)
.jpg)
Organizing Your Coils
And lastly, when you end up with lots of coils, it can be tricky to organize them. You could just keep them in the boxes they came in, and maybe store those boxes on a shelf in a closet. I didn't have a closet, but I had an extra set of Rubbermaid drawers. I used some pieces of cardboard to divide the drawers into smaller sections, and labels from the dollar store with the coil sizes on them. The handiest thing I've found to keep on the labels is how many pages fit in each coil size.
.jpg)
.jpg)
.jpg)
.jpg)
.jpg)
Okay. I think this wraps up the way I organize things. Store your PDFs on your computer, store your books on a bookshelf... that's nothing new. I'm such a geek though that I am putting some of my organization stuff under Motivation because it is *that* much fun :D :D